







Buying a used graphics card can be one of the smartest ways to stretch a PC-building budget. Instead of spending a fortune on a brand-new GPU, you can often pick up a previous-generation model with plenty of gaming life left in it for significantly less money. But there is one catch: you usually don’t know exactly what that graphics card has been through.
Maybe the previous owner kept the PC spotless. Maybe the GPU spent years inside a dusty case with barely any maintenance. It could have been used for occasional gaming, or it might have run demanding workloads for hours every day. Fortunately, a dirty graphics card isn’t necessarily a bad graphics card.
In many cases, cleaning a GPU, replacing its thermal paste, inspecting the thermal pads, and removing years of accumulated dust can make a dramatic difference to temperatures, acoustics, and overall reliability. This guide explains how to clean a GPU safely, how to deep-clean a used graphics card, when thermal paste should be replaced, what to know about thermal pads, and which mistakes you absolutely should avoid.
Table of Contents
- Why Cleaning a Used GPU Matters
- What You Should Check Before Opening the GPU
- Tools You Need to Clean a GPU
- How to Clean a GPU Without Taking It Apart
- Step 1: Find a Model-Specific GPU Teardown
- Step 2: Remove the Graphics Card and Disconnect Power
- Step 3: Carefully Remove the GPU Cooler
- Step 4: Remove the Old Thermal Paste
- Step 5: Clean the Heatsink and Fans
- Step 6: Inspect the Thermal Pads
- Step 7: Apply Fresh Thermal Paste
- Step 8: Reassemble the Graphics Card Correctly
- The Biggest Mistakes to Avoid
- How to Test Your GPU After Cleaning
- How to Tell Whether Your Cleaning Worked
- How Often Should You Clean a GPU?
- Buying a Used GPU: Cleaning Isn't Everything
- Can Cleaning a GPU Increase FPS?
- Signs That Your GPU May Need a Repaste
- Frequently Asked Questions About GPU Cleaning
- 1. How often should I clean my GPU?
- 2. Can I use 70% isopropyl alcohol?
- 3. Do I need to replace thermal pads every time?
- 4. What happens if I use the wrong thermal-pad thickness?
- 5. Can I clean a GPU without removing the heatsink?
- 6. Can I use a vacuum cleaner?
- 7. How much thermal paste should I use?
- 8. Can I wash the PCB with water?
- 9. Can a dirty GPU cause crashes?
- 10. Should I test a used GPU before cleaning it?
- 11. Can a former mining GPU still be good?
- 12. How can I tell whether a GPU has been abused?
- 13. What should I do if a GPU screw is stripped?
- 14. Is an anti-static wrist strap necessary?
- 15. Can cleaning make a GPU run quieter?
- Conclusion: Give Your Used GPU a Second Life
Why Cleaning a Used GPU Matters
A graphics card is essentially a heat-producing machine with a cooling system attached to it. When you’re gaming, rendering video, running 3D applications, or performing other GPU-intensive workloads, the graphics processor generates substantial heat. That heat travels through the cooler and eventually gets expelled from the system by the fans. The problem is that those same fans constantly pull air through the card.
Over time, dust accumulates between the heatsink fins, around the fan blades, inside the shroud, and on the PCB. Pet hair and other debris can make the problem even worse. A few months of dust isn’t usually catastrophic. Years of accumulation, however, can significantly restrict airflow.
The result can be:
- Higher GPU temperatures
- Higher hotspot temperatures
- Louder fan noise
- More aggressive fan speeds
- Reduced boost-clock stability
- Thermal throttling
- Increased stress on cooling components
- Poorer long-term reliability
There’s another issue with older graphics cards: thermal interface materials age. Thermal paste can dry out over time. Thermal pads can become compressed, damaged, or lose some of their effectiveness. When you buy a used GPU, you inherit all of that wear. That’s why cleaning should be one of the first maintenance tasks after purchasing a second-hand graphics card.
What You Should Check Before Opening the GPU
Before grabbing a screwdriver, there’s an important rule:
Test the graphics card before you take it apart whenever possible. Install it in your computer and make sure it actually works. Check whether the display output functions correctly. Install the appropriate graphics driver and run a demanding game or benchmark. Pay attention to temperatures, fan behavior, clock speeds, crashes, and visual artifacts.
This gives you a baseline. If the card is overheating before cleaning but becomes significantly cooler afterward, you’ll know your maintenance made a difference. If an unrelated problem appears after disassembly, troubleshooting becomes considerably more difficult. It’s also worth taking photographs of the card before opening it.
Take pictures of:
- Screw locations
- Cable connections
- Thermal-pad positions
- The PCB
- The heatsink
- The fan connectors
- The backplate
Those photos can become incredibly useful when you’re staring at a pile of screws later.
Tools You Need to Clean a GPU
You don’t need a professional electronics workshop to clean a graphics card. However, using the right tools makes the job safer and easier.
Precision Screwdriver Set
A graphics card may contain several different screw types and sizes. A precision Phillips screwdriver set is essential. Depending on the model, you may encounter Phillips #0, #1, or other small bits. Don’t force a screwdriver into a screw that doesn’t fit properly. A damaged screw head can turn a straightforward cleaning job into a frustrating repair.
High-Purity Isopropyl Alcohol
For removing old thermal paste, use 90% or higher isopropyl alcohol, preferably 99%. High-purity isopropyl alcohol evaporates quickly and doesn’t leave the kind of residue associated with ordinary household cleaning products.
Microfiber Cloth
A clean microfiber cloth works well for wiping the heatsink’s contact surface and removing residue. Avoid abrasive materials that could scratch surfaces.
Cotton Swabs
Cotton swabs are useful for carefully cleaning small areas around the GPU die and heatsink. Use them gently. There’s no reason to attack hardened thermal paste with excessive force.
Compressed Air or an Electric Air Duster
Compressed air can remove loose dust from heatsink fins and fans. If you’re using compressed air, hold the GPU fan blades in place while cleaning them. Allowing the fan to spin excessively fast can put unnecessary stress on the fan bearings. An electric air duster designed for electronics can also be useful.
Thermal Paste
If you’re opening the cooler, you’ll probably want a quality non-conductive thermal paste suitable for GPU applications. Don’t use random household compounds or materials designed for unrelated purposes.
Replacement Thermal Pads
Thermal pads are model-specific. The thickness isn’t universal. A graphics card might use different pad thicknesses in different areas.
Never assume that a particular GPU series uses the same thermal-pad thickness across every model.
Check a teardown, service manual, manufacturer’s documentation, or reliable model-specific information before purchasing replacement pads.
How to Clean a GPU Without Taking It Apart
Not every dirty graphics card needs a complete teardown. If the GPU is relatively healthy and you’re simply dealing with surface dust, you can perform basic maintenance without removing the cooler.
First, shut down the PC completely.
Turn off the power supply and disconnect the power cable. Give the system a moment before handling the hardware. Remove the GPU from the case if necessary. Hold the fan blades stationary with a finger or suitable non-damaging method, then use compressed air to blow dust through the heatsink. Work from several angles rather than blasting everything from one direction.
Pay particular attention to the spaces between heatsink fins.
You can also gently clean the exterior of the fans and shroud with a microfiber cloth. This type of maintenance is useful every few months, especially if your computer operates in a dusty environment. However, surface cleaning won’t replace old thermal paste or allow you to inspect the internal thermal pads.
For that, you’ll need to go deeper.
Step 1: Find a Model-Specific GPU Teardown
This is probably the most important preparation step.
Do not assume every graphics card comes apart the same way.
An ASUS graphics card may have a completely different cooler assembly from an MSI model. A Gigabyte card may use different screw arrangements. Founders Edition cards can have their own unique construction. Before opening yours, search for a teardown or disassembly guide for the exact model.
For example, don’t simply search for “RTX 4070 teardown” if you own a specific custom-design card. Search for the full model name.
Look for a video or guide that clearly shows:
- Where the cooler screws are located
- Which screws need to be removed
- Where fan cables are connected
- Where RGB cables are located
- How the heatsink separates from the PCB
- Thermal-pad locations
- Correct reassembly procedures
Watch the entire process before you start. That five or ten minutes of preparation can save you from an expensive mistake.
Step 2: Remove the Graphics Card and Disconnect Power
Turn the PC off completely.
Unplug the power cable and remove the graphics card from the system.
Before touching the PCB, discharge static electricity by grounding yourself appropriately. An anti-static wrist strap is an excellent option when working with sensitive electronics.
Keep the GPU on a clean, dry, non-conductive work surface. Avoid carpets and environments where static electricity is likely to build up. Also disconnect any external GPU power cables before beginning disassembly.
Step 3: Carefully Remove the GPU Cooler
Now comes the part where patience matters.
Locate the screws securing the cooler to the PCB. Many graphics cards use spring-loaded screws around the GPU die. Loosen them gradually and evenly rather than completely removing one screw while leaving the others tight.
Once the screws are removed, do not immediately pull the cooler away. The fans and RGB lighting may still be connected to the PCB.
Gently separate the cooler enough to identify the cables, then disconnect them carefully. Never yank a tiny connector by its wires.
Once everything is disconnected, you should be able to separate the PCB from the cooling assembly.
Keep every screw organized. A simple trick is to place screws in separate labeled containers or small pieces of tape according to where they came from.
Different screws can have different lengths, and putting a long screw in the wrong location can potentially damage the PCB.
Step 4: Remove the Old Thermal Paste
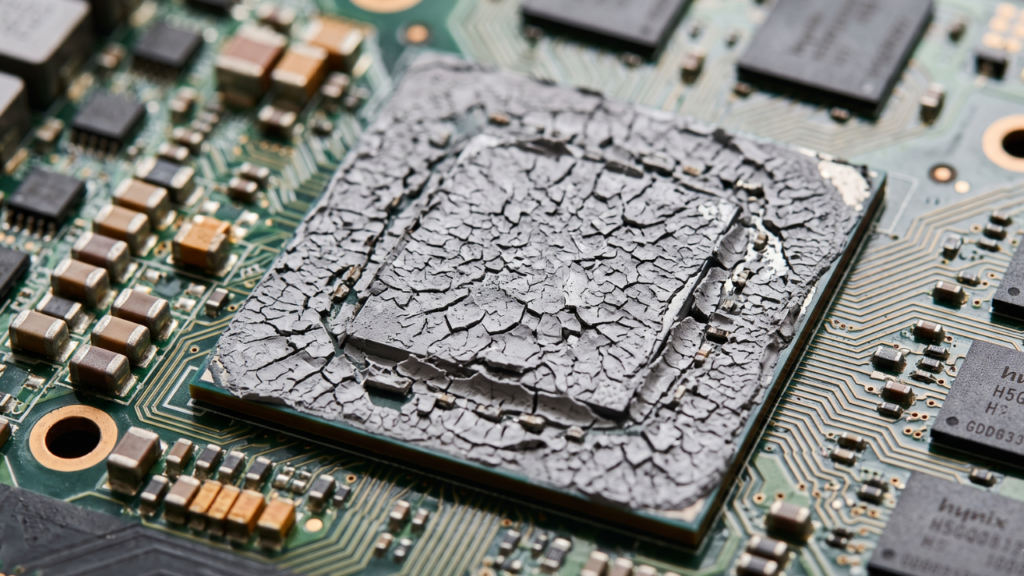
Caption: Factory thermal paste often dries out over years of heavy gaming, leading to severe overheating.
Once the cooler is separated, you’ll probably see old thermal paste covering the GPU die and the cooler’s contact plate.
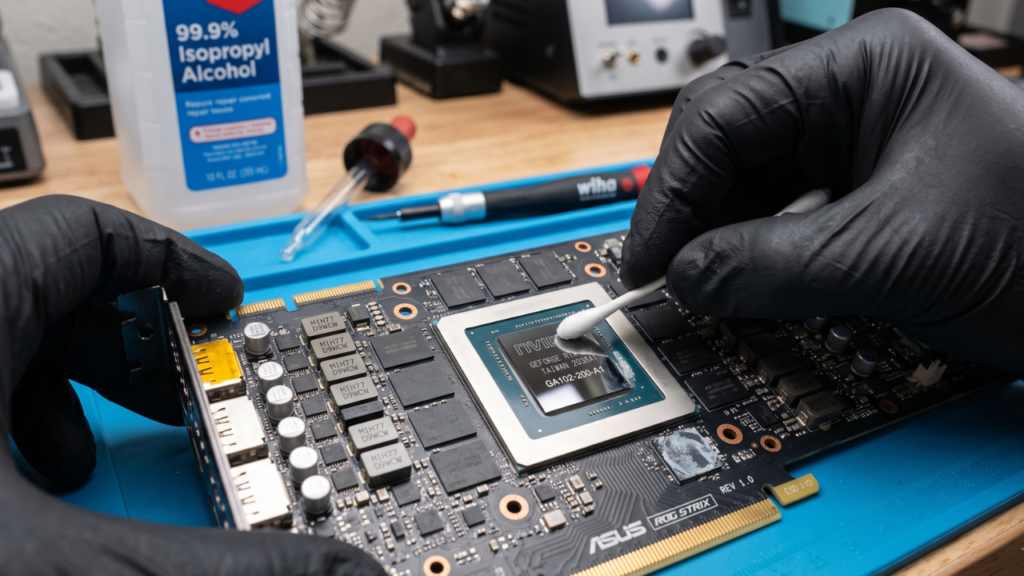
Old paste may be soft, dry, cracked, or almost completely hardened. Apply a small amount of high-purity isopropyl alcohol to a lint-free cloth or cotton swab.
Gently work the old paste away. You don’t need to scrape aggressively. The GPU die is delicate, and excessive force is unnecessary.
Continue cleaning until the die and heatsink contact surface are free from old thermal compound. Allow the alcohol to evaporate completely before applying new thermal paste.
Step 5: Clean the Heatsink and Fans
This is where a used graphics card can look dramatically different after maintenance. Use compressed air to blow dust from the heatsink fins. If the heatsink is particularly dirty, you can use a soft brush designed for electronics to loosen stubborn debris.
Pay attention to the narrow channels between the fins. Dust often forms a dense layer that looks almost like felt.
Clean the fan blades as well. If the fans have accumulated oily grime or stubborn dirt, gently wipe them using an appropriate amount of isopropyl alcohol on a microfiber cloth or swab.
Never pour cleaning liquid directly onto the GPU. The goal is to apply controlled amounts of cleaning solution to the cloth or swab—not flood the electronics.
Step 6: Inspect the Thermal Pads
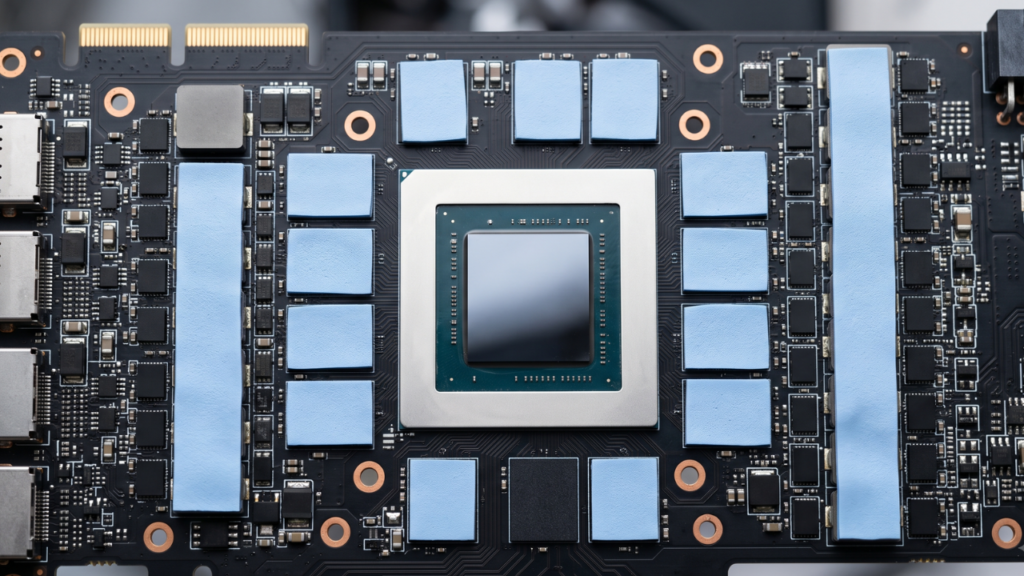
With the cooler removed, you’ll likely see thermal pads covering memory modules and other heat-producing components. These pads transfer heat from those components to the heatsink. Inspect them carefully.
Look for:
- Tears
- Missing sections
- Severe compression
- Crumbling material
- Improper positioning
- Evidence of contamination
- Pads that have shifted away from the intended components
If the pads are still in good condition, replacing them isn’t automatically necessary. In fact, replacing perfectly good thermal pads can introduce unnecessary risk because incorrect pad thickness can create cooling problems. If you do need replacement pads, determine the correct thickness for your exact GPU model.
Don’t guess. A thermal pad that is too thin may fail to make proper contact. A pad that is too thick can prevent the heatsink from sitting correctly against the GPU die. That second problem is especially serious because poor die contact can result in extremely high core temperatures.
Step 7: Apply Fresh Thermal Paste
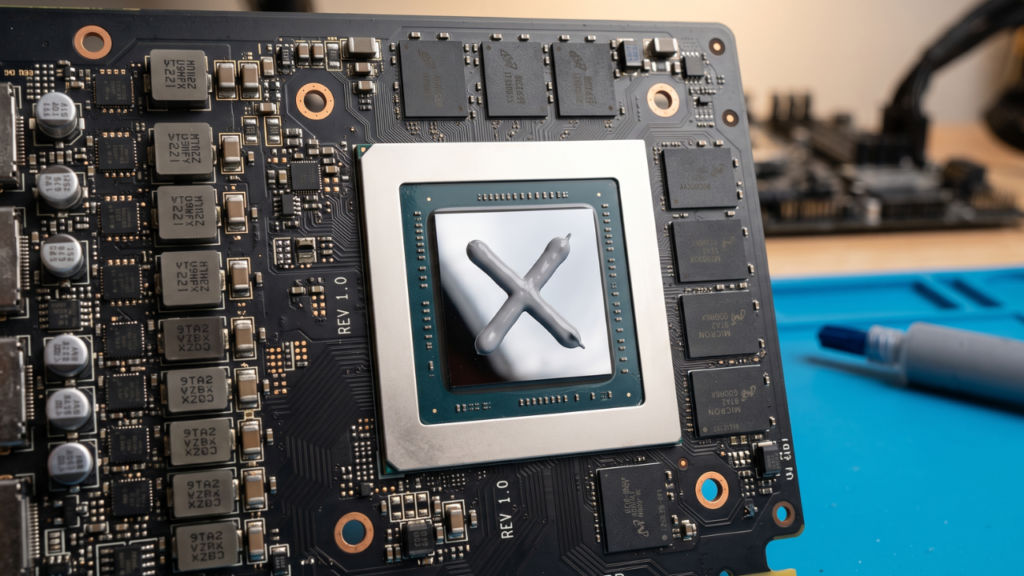
After cleaning the GPU die and cooler contact surface, it’s time for fresh thermal compound. Apply an appropriate amount of quality thermal paste to the GPU die. Unlike a conventional CPU with an integrated heat spreader, a GPU typically exposes its silicon die directly to the cooler’s contact plate. The goal is to achieve complete and consistent contact between the die and the cooler.
You don’t need to cover the entire die manually with a finger or tool. A suitable application pattern and correct mounting pressure should spread the compound across the contact area.
Avoid using an excessive amount, but don’t apply such a tiny amount that portions of the die remain dry. The exact quantity can vary depending on the die size and paste characteristics.
Step 8: Reassemble the Graphics Card Correctly
Reassembly is just as important as disassembly.
Before closing everything up, double-check:
- Thermal pads are correctly positioned
- Protective films have been removed from replacement pads
- Thermal paste is correctly applied
- Fan cables are ready to reconnect
- RGB cables are positioned correctly
- No screws or tools are trapped inside the cooler
- The PCB is aligned correctly
Reconnect the fan and RGB cables before completely securing the cooler. When tightening the GPU cooler screws around the die, use a cross-pattern or diagonal sequence.
Don’t fully tighten one corner while leaving the opposite corner loose. Instead, gradually tighten the screws in several passes. This helps distribute mounting pressure more evenly across the GPU die. Once the cooler is secure, reinstall any backplate or other components you removed.
The Biggest Mistakes to Avoid
GPU cleaning isn’t particularly complicated, but several mistakes can cause expensive damage.
Don’t Use Water
Never clean an assembled GPU PCB with water. Water can create electrical problems and can also contribute to corrosion. Use appropriate electronics-safe cleaning methods instead.
Don’t Use a Household Vacuum
Standard household vacuum cleaners can generate static electricity, and static discharge is something you don’t want near exposed electronics. Use compressed air or an electronics-oriented air duster instead.
Don’t Let the Fans Spin Wildly
Compressed air can turn GPU fans into tiny turbines. Hold the blades stationary while cleaning.
Don’t Guess Thermal-Pad Thickness
This deserves repeating.
Thermal-pad thickness matters.
Using a random thickness because it “looks about right” can create poor contact and overheating.
Don’t Mix Up Screws
Keep screws organized. A screw that looks almost identical may be a different length.
Don’t Rush the Cooler Removal
If the heatsink doesn’t separate easily, stop. Check for another screw or cable. Forcing the cooler apart can damage the PCB or tear a connector.
How to Test Your GPU After Cleaning
Once everything is reassembled, reinstall the graphics card and connect the required power cables. Boot the computer and check whether the display works normally. Then monitor temperatures at idle.
After that, launch a game or benchmark and observe:
- GPU temperature
- GPU hotspot temperature
- Fan speed
- Core clock
- Memory clock
- Power consumption
- Stability
- Visual artifacts
A benchmark such as 3DMark, Unigine Superposition, or another trusted GPU stress-testing application can help establish whether the card remains stable under load.
You don’t need to torture the GPU for hours. A controlled test of sufficient duration to reproduce your normal workload is generally more useful. If you see colored dots, flashing polygons, unusual textures, crashes, driver resets, or other graphical abnormalities, investigate before assuming the card is healthy.
How to Tell Whether Your Cleaning Worked
The most useful comparison is between your pre-cleaning and post-cleaning results. Suppose your used GPU previously reached 82°C under a particular gaming workload while running its fans aggressively. After cleaning and repasting, it might run noticeably cooler and quieter. Don’t obsess over one specific temperature number, though.
GPU temperatures depend on:
- Ambient room temperature
- Case airflow
- Fan curves
- GPU model
- Power limit
- Game workload
- Clock speeds
- Cooler design
- Thermal paste
- Thermal-pad condition
The change compared with your own baseline is often more informative than a universal temperature target. If temperatures improve, fan noise decreases, and the card remains stable, your maintenance was likely successful.
How Often Should You Clean a GPU?
There isn’t one perfect schedule for every computer. A dusty room may require more frequent cleaning than a clean, filtered environment. As a general maintenance habit, inspect the GPU every few months. If you see visible dust buildup, clean the heatsink and fans.
A full teardown is different.
There’s no need to automatically disassemble a perfectly healthy graphics card every few months. Opening the cooler introduces its own risks. A deep cleaning and repaste should generally be based on condition rather than an arbitrary calendar. Older used GPUs deserve particular attention because their thermal interface materials may already have years of service behind them.
Buying a Used GPU: Cleaning Isn’t Everything
A beautifully cleaned graphics card can still have underlying hardware problems. That’s why your inspection should begin before the teardown.
Check the card for:
- Physical PCB damage
- Burn marks
- Broken connectors
- Damaged fan blades
- Corrosion
- Missing components
- Excessive screw damage
- Signs of amateur repairs
- Unusual BIOS configurations
Software can also reveal useful information. A tool such as GPU-Z can help verify the GPU model, memory configuration, bus interface, BIOS information, and other hardware details. This is particularly useful when buying second-hand hardware because counterfeit or incorrectly advertised cards do exist. Don’t rely solely on the seller’s description.
Can Cleaning a GPU Increase FPS?
Cleaning doesn’t magically make a GPU more powerful. A graphics card won’t suddenly gain a new generation of shader cores because you removed dust. However, cleaning can improve gaming performance when the card was previously overheating and thermal throttling. Modern GPUs dynamically adjust their operating behavior based on factors including temperature and power.
If excessive heat causes the GPU to reduce its operating clocks, performance can suffer. After cleaning, if the GPU maintains higher clocks for longer periods, you may see improved or more consistent frame rates. In many cases, the more noticeable benefit is simply lower noise and better thermal behavior. That’s still a significant win.
Signs That Your GPU May Need a Repaste
Cleaning the outside of a graphics card won’t solve every thermal problem.
A repaste may be worth considering when you notice:
- Temperatures increasing significantly over time
- Fans constantly running at high speeds
- Excessive fan noise
- Sudden thermal throttling
- Large temperature increases under familiar workloads
- Poor cooler contact
- Extremely dry or cracked original thermal compound
However, temperature alone isn’t proof that thermal paste is bad. Check your case airflow, ambient temperature, fan curve, heatsink cleanliness, and workload first. A GPU running warmer than another model isn’t necessarily defective.
Frequently Asked Questions About GPU Cleaning
1. How often should I clean my GPU?
For basic dust removal, checking the card every three to six months is a reasonable starting point. A full teardown should be less frequent and based on the card’s condition.
2. Can I use 70% isopropyl alcohol?
Higher-purity isopropyl alcohol is generally preferable for electronics cleaning because it contains less water and evaporates quickly. 90% or higher is a better choice for removing thermal paste.
3. Do I need to replace thermal pads every time?
No. If the original pads remain intact, correctly positioned, and in good condition, they may not need replacement.
4. What happens if I use the wrong thermal-pad thickness?
A pad that’s too thin may fail to contact the heatsink. A pad that’s too thick can interfere with proper cooler contact against the GPU die. Either situation can increase temperatures.
5. Can I clean a GPU without removing the heatsink?
Yes. Basic dust removal can be done without opening the card. You can use compressed air to clean the fans and heatsink fins.
6. Can I use a vacuum cleaner?
It’s best to avoid ordinary household vacuum cleaners around exposed PC components because of potential static electricity concerns.
7. How much thermal paste should I use?
Use enough to establish complete contact between the GPU die and cooler without creating a huge mess. A suitable small application is generally sufficient, with the exact amount depending on the die and paste.
8. Can I wash the PCB with water?
No. Don’t use water on an assembled graphics card PCB. Use appropriate electronics-cleaning methods instead.
9. Can a dirty GPU cause crashes?
It can contribute to overheating, and excessive temperatures can contribute to instability. However, crashes can have many other causes, including drivers, faulty memory, power problems, and failing hardware.
10. Should I test a used GPU before cleaning it?
Absolutely. Whenever possible, establish that the GPU works before disassembling it. That gives you a useful baseline and can expose existing problems.
11. Can a former mining GPU still be good?
Yes. A graphics card’s previous use doesn’t automatically determine its current condition. What matters is its actual hardware health, cooling condition, operating history when known, and test results.
12. How can I tell whether a GPU has been abused?
Look for physical damage, excessive dust, damaged fans, corrosion, unusual modifications, BIOS irregularities, unstable behavior, and suspicious repairs. None of these signs alone proves abuse, so test the card thoroughly.
13. What should I do if a GPU screw is stripped?
Stop applying excessive force. Use the correctly sized bit first. If the head is already damaged, a suitable screw-extraction technique may help, but be extremely careful not to slip and damage the PCB.
14. Is an anti-static wrist strap necessary?
It’s strongly recommended when working with exposed PCBs. At minimum, use sensible ESD precautions and work in a suitable environment.
15. Can cleaning make a GPU run quieter?
Yes. Removing dust from the heatsink and fans can improve airflow, while replacing degraded thermal paste may reduce temperatures. Lower temperatures can allow the fan system to operate less aggressively.
Conclusion: Give Your Used GPU a Second Life
A used graphics card doesn’t have to look perfect when you buy it. Dust, old thermal paste, and worn thermal pads are all maintenance issues that can potentially be addressed. The important part is knowing how to clean a GPU without damaging the hardware.
Start conservatively. Test the card before opening it, document its condition, find a teardown guide for the exact model, and keep track of every screw and cable. Use high-purity isopropyl alcohol for old thermal paste, clean the heatsink thoroughly, inspect the thermal pads, and never guess their required thickness.
Most importantly, don’t rush.
A graphics card contains delicate electronics that can survive years of gaming but may not survive one careless screwdriver slip. When done correctly, however, a thorough GPU cleaning can be incredibly rewarding. You can reduce accumulated dust, improve thermal performance, quiet down an aging cooler, and potentially restore a second-hand graphics card to excellent working condition.
If you’ve picked up a used GPU for your gaming PC, a careful cleaning and inspection is one of the best ways to protect that investment and get the most life possible from your hardware.
External Authority Suggestions
- Read the essential guide to Build a $1500 Gaming PC in 2026 for broader PC building context.
- Learn more about the current market with GPU Pricing Reality: Secure the Best Graphics Card before navigating the second-hand market.